More Slide Tricks | Effective Teaching Presentations
TAPP Radio Episode 95
Episode
Episode | Quick Take
Everybody loves to hate teaching with slides. But maybe that’s because we’ve not fully developed our skills! Host Kevin Patton build on previous advice to improve our mastery of the slide-of-hand we need for effective learning. Let’s turn that hate into love! This is the first of a two-episode series.
- 00:00 | Introduction
- 00:58 | Buy One, Get One
- 02:06 | I Need Help!
- 10:20 | Sponsored by AAA
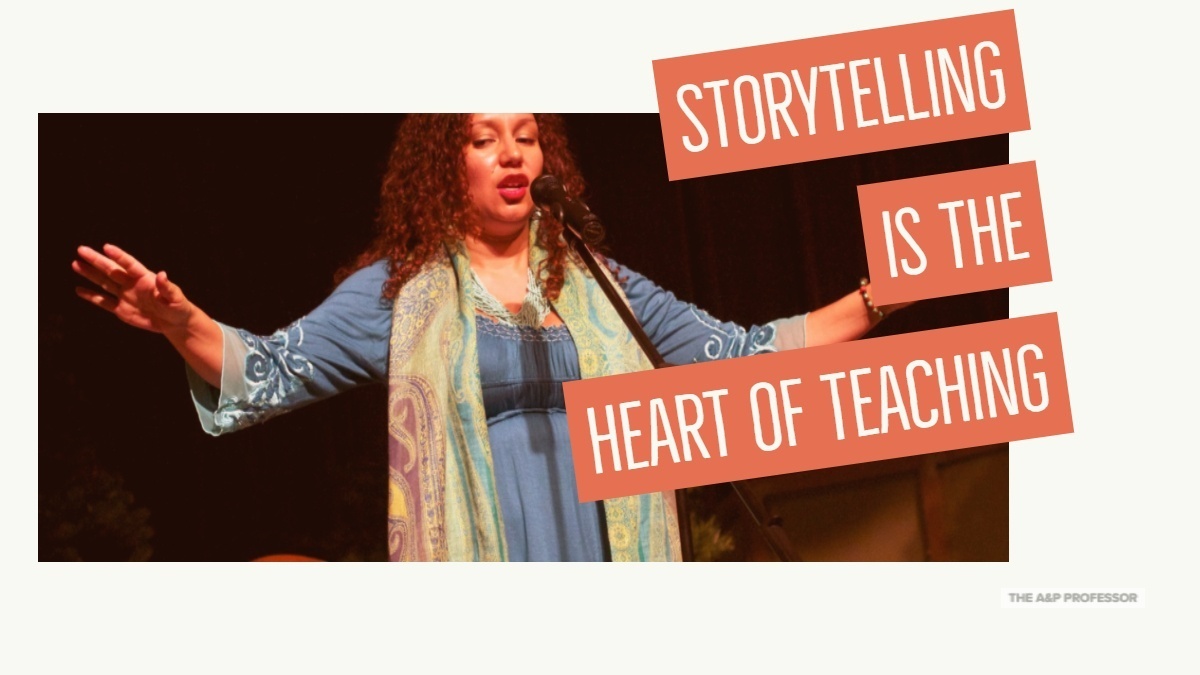
- 11:47 | Less Text, More Story
- 24:25 | Sponsored by HAPI
- 25:49 | Chunky Style Slides
- 39:44 | Sponsored by HAPS
- 41:08 | Where Art Thou?
- 48:16 | Slide Tricks
- 50:12 | Staying Connected

Episode | Listen Now
Episode | Show Notes
The purpose of life is not to be happy. It is to be useful, to be honorable, to be compassionate, to have it make some difference that you have lived and lived well. ( Ralph Waldo Emerson)
Buy One, Get One
1 minute
This is the first of two episodes in a series about using slides to teach effectively. Yeah, I know—everybody hates the idea of using slides. But maybe it’s because we don’t know how to use them well. And yeah, some of this has been covered in different ways in previous episodes. But this kind of overlap—or layering—is a proven learning technique, right?
- Teaching Slides: Smooth and Simple Animations Dramatize the Story of A&P | TAPP 89
- Slides Serve the Story of Anatomy & Physiology | Episode 66
- Simple Ideas for Pandemic Teaching | Episode 67
- The Storytelling Special | Episode 48

I Need Help!
8 minutes
We’re all a bit overloaded and overwhelmed these days, right? Yeah, I’m feeling that pain right now. I need help. Will you please help me?
- TAPP Journal Club with Krista Rompolski
- Test Question Templates Help Students Learn | TAPP 70

Sponsored by AAA
1.5 minute
A searchable transcript for this episode, as well as the captioned audiogram of this episode, are sponsored by the American Association for Anatomy (AAA) at anatomy.org.
Don’t forget—HAPS members get a deep discount on AAA membership!
![]()
Less Text, More Story
12.5 minutes
I’ve said this before. I say it all the time. You’re sick of me saying it. But you know what? We need that continual and consistent messaging so that maybe it will eventually become part of our working memory—our conscious awareness. So here, we go again.
- Teaching Slides: Smooth and Simple Animations Dramatize the Story of A&P | TAPP 89
- Slides Serve the Story of Anatomy & Physiology | Episode 66
- Simple Ideas for Pandemic Teaching | Episode 67
- The Storytelling Special | Episode 48
- 10 tips on how to make slides that communicate your idea, from TED’s in-house expert (example of a TED Talk) my-ap.us/3gI6FgP
Sponsored by HAPI Online Graduate Program
1.5 minute
The Master of Science in Human Anatomy & Physiology Instruction—the MS-HAPI—is a graduate program for A&P teachers, especially for those who already have a graduate/professional degree. A combination of science courses (enough to qualify you to teach at the college level) and courses in contemporary instructional practice, this program helps you be your best in both on-campus and remote teaching. Kevin Patton is a faculty member in this program at Northeast College of Health Sciences. Check it out!

Chunky Style Slides
14 minutes
If we follow the Universal Design for Learning (UDL) mindset, we know that chunking content into pieces that are easy for students to focus on. But why do we often end up putting a lot of concepts on one teaching slide? Here, I suggest that “chunky style” may be best for learning. And I also suggest that a useful mantra to chant while putting text into our slides is, “think telegraph, not paragraph.”
- Guidelines for Universal Design for Learning (UDL) my-ap.us/UDLguidelines

Sponsored by HAPS
1 minute
The Human Anatomy & Physiology Society (HAPS) is a sponsor of this podcast. You can help appreciate their support by clicking the link below and checking out the many resources and benefits found there. Watch for virtual town hall meetings and upcoming regional meetings!
![]()
Where Art Thou?
7 minutes
Lots of ideas on using images effectively in our slides. Images may be the true heart and purpose of using slides to teach.
Slide Tricks
2 minutes
A wrap up of points made in this episode—there are so many! And a look ahead at the next episode.

Need help accessing resources locked behind a paywall?
Check out this advice from Episode 32 to get what you need!
Episode | Captioned Audiogram
Episode | Transcript
The A&P Professor podcast (TAPP radio) episodes are made for listening, not reading. This transcript is provided for your convenience, but hey, it’s just not possible to capture the emphasis and dramatic delivery of the audio version. Or the cool theme music. Or laughs and snorts. And because it’s generated by a combo of machine and human transcription, it may not be exactly right. So I strongly recommend listening by clicking the audio player provided.
![]() This searchable transcript is supported by the
This searchable transcript is supported by the
American Association for Anatomy.
I'm a member—maybe you should be one, too!
Introduction
Kevin Patton (00:01):
The essayist and Unitarian minister, Ralph Waldo Emerson, once wrote, “The purpose of life is not to be happy. It is to be useful, to be honorable, to be compassionate, to have it make some difference that you have lived and lived well.”
Aileen (00:25):
Welcome to The A&P Professor, a few minutes to focus on teaching human anatomy and physiology with a veteran educator and teaching mentor, your host, Kevin Patton.
Kevin Patton (00:40):
In this episode, I discuss a whole bag of tricks to make our teaching slides way more effective for learning.
Buy One, Get One
Kevin Patton (00:59):
I got to tell you something about this episode that you’re going to find to be totally believable, and that is, I had some notes about using teaching slides. More slide tricks, right? And when I looked at those notes, I thought, “You know what? I only have a few notes here. This isn’t going to take long. This is going to be a short episode.” And oh, man, I just got talking about it and I kept thinking of other things and so on, because I teach people how to use slides all the time and I use slides all the time. I’m always learning more about slides and I’m looking for more information about slides. And you know what? I just ended up with this like a really long, really, really long segment on slides. So I’m going to do something that I’ve not done in a while and that is, split it up into two episodes. So, the first part of it is in this episode. You can look forward to more slide tricks in the following episode, that is Episode 96, which will be released in about two weeks…
I Need Help!
Kevin Patton (02:06):
Hey, before we jump into today’s topic, I’m going to take a brief moment to talk about this podcast. Like a lot of projects that we all start, it often seems like it’ll take a lot less time and effort than it really ends up taking once we get it up and running and down the road a ways. Well, like many of you, I have a lot of other projects and job responsibilities and family stuff to attend to as well. Well, it’s gotten to the point where I could really use some more help. So I’m asking you, will you help me?
Kevin Patton (02:59):
You may be wondering how you can be of help. Well, here’s an example. I was having this very same conversation with our friend, Krista Rompolski, last year. And she offered to help me by doing those wonderful Journal Club episodes. I’m grateful that by taking responsibility for the content of a handful of episodes, my load is significantly lighter. She did this for us while also attending to her own job responsibilities, including that pandemic chaos that we all coped with, and a move to a new college, and a move of her family to a new home in a new town, and the birth of her new baby boy. And wow, those Journal Club episodes have turned on to be very thought-provoking and helpful and, well, just kind of awesome. Am I right?
Kevin Patton (04:07):
That kind of contribution really fits with Krista’s talents and goals and passions. Your talents and goals and passions are unique to you, but I’m sure you have something to share with other A&P faculty. No, really, you do. I know you do, and you know you do. It could be something ongoing like Krista’s Journal Club. Maybe a special series of episodes. But maybe instead it’s a series of segments within different episodes, or maybe it’s just one episode or just one segment in an episode. I know that a lot of you have published articles or presented papers or workshops. Why not spread the word further?
Kevin Patton (05:02):
Remember back in Episode 70 when Greg Crowther shared his ideas for using test question templates or TQTs to help students really engage in critical thinking as they prepare for their tests? He had just published a paper on that in HAPS Educator. And my interview with him helped you learn about that technique. But it also helped lighten my load. So, Greg, thanks for that and for your ideas about teaching and learning. Even if it’s something you don’t think rises to the level of a workshop or journal article, if it’s useful to you as an A&P instructor, it’s going to be useful to someone else. And that’s what this podcast is all about; the big, the medium, the little things that we’ve each picked up along the way that make teaching and learning go smoother and more effectively.
Kevin Patton (06:08):
I mean, come on, we’ve had segments on changing the color of pen we used to mark papers, right? That’s a small little thing, but it can be helpful to somebody. And don’t think that you’re too new at teaching A&P, or like me too old and worn out, or that your idea isn’t all that significant or unique or amazing. After years of learning from y’all at conferences and workshops and possibly most often across that couple of drinks at the cafe or at a random chat on the phone or on Twitter, I know that it’s those little gems that you think are kind of worthless throwaways that really sparkle for me. They’ve given me ideas for my own teaching, or relating to my students, or coping with the academic life.
Kevin Patton (07:10):
You want to call in with a tip or a question? Please, please, please do it. Got an idea for a segment in an episode or a series of segments? Well, shoot me an email with your idea and let’s see if it’ll work. Want me to interview you about your idea or publication or workshop? Even if it was years ago, well, let’s talk. Want to do a whole episode by yourself or a series of episodes? Wow, that would be amazing. Or maybe you see a better fit by contributing content, maybe an outline or a script that I deliver in the podcast, or helping me find and [inaudible 00:07:57] new discoveries that A&P faculty ought to know about. Or maybe setting up interviews for me to talk to people that you want to hear from, or maybe interviewing them yourself.
Kevin Patton (08:10):
Now, don’t get me wrong. I have a deep, deep, deep file of topics for future episodes. In fact, that file is getting bigger as I produce more episodes, not smaller. But it sure does help to get some breaks when it’s your topics taking the center stage sometimes. Or maybe you want to instead help with social media for the A&P Professor, or maybe with helping me manage the micro-credentials that y’all can earn for engaging them with this podcast, or maybe you want to help moderate our online teaching community, or maybe you have an idea for teaching a micro course inside that community. Or I don’t know, maybe you can think of something else. Something small. I don’t want it to disrupt your life. And then my load will lighten and I’ll be forever grateful for your help.
Kevin Patton (09:18):
And maybe I’ll have a bit more time to spend with my elderly mom who’s dealing with her lung cancer and other end of life challenges. And maybe I’ll have a bit more time to spend visiting my first grandchild who was born just a few weeks ago, who lives a few hours away from me and who very [inaudible 00:09:40] was not named Carbaminohemoglobin as I had strongly suggested. I don’t know how that happened. Well, it’ll help with all the bazillion other things I have going on.
Kevin Patton (09:55):
You know this message is coming at just the right time, don’t you? I know that. You’ve been thinking of something that you want to do, and you need this nudge to get you moving on that idea. well, consider yourself nudged.
Sponsored by AAA
Kevin Patton (10:21):
A searchable transcript and a captioned audiogram of this episode are supported by AAA the American Association for Anatomy at anatomy.org. Because I mentor so many A&P faculty, I’m often asked about my support of AAA and whether, well, is it worth joining? While it’s true that AAA provides financial support of this podcast, I wouldn’t accept any sponsorship from an organization that doesn’t align with the mission and the spirit of the A&P Professor. And so, my answer to that question of whether AAA’s worth joining is, well, yes. Wholeheartedly, yes. Many of these folks are already HAPS members so they’re surprised to find out that they get a deep discount on AAA membership. And they’re also often surprised that AAA is not entirely about anatomy research or about medical education strictly. AAA has a rich set of resources and networking opportunities for those of us who teach primarily undergraduate A&P too. Just go to anatomy.org and start exploring. You’ll see what I mean.
Less Text, More Story
Kevin Patton (11:48):
Everybody loves to hate slides. I mean, teaching slides, presentation slides that we make in PowerPoint or Google or whatever platform that you use. People just seem to hate them. At least they talk like they hate them, and they look down on them, and they denigrate them and lift up their noses at them and so on. And yet, most of us use them at some point. And I think part of it is linked to this idea that lecture is bad and other kinds of things like active learning and so on is good. And of course, it’s not as black and white as that. We all know that. We all know that teaching involves using a number of different tools and using the right tool for the right job.
Kevin Patton (12:36):
And you know what? We all know that sometimes teaching slides are the right tool for a particular job whether it is a lecture or a mini lecture or a demonstration, or maybe it’s a preview to an active learning assignment, or maybe it’s the way we present a case for a case study assignment or a group activity, or maybe it’s the way that we present the questions that we want our students to discuss in small groups or in a large group. There are a lot of different ways to use slides. And you know what? We usually don’t do a very good job of that. I’m not claiming to be a wiz at slides, to be the expert at slides, but I’ve learned a lot about making my slides better and more effective tools for the various jobs that I use them for. I’ve been doing this forever. Even not being a very brilliant guy, I’ve picked up a few things. And I also realized that I have a long way to go. But I want to share with you some of the things that I think do work well.
Kevin Patton (13:47):
And so, these are tricks for using the tool that you already have. There’s some built in features and there are ways of using that tool that I think will make it go better for you and therefore go better for your students. They won’t hate your slides anymore. You won’t hate your slides anymore. Your fellow teachers won’t hate your slides anymore. And you know what? When your dean comes into the back of your classroom to observe your teaching, they’re not going to hate your slides anymore. So, win, win, win, right? Okay. I have a variety of tips. Some of them are related to one another. Some of them overlap things you’ve heard before here and maybe take it a notch further. So let’s go ahead and get started.
Kevin Patton (14:37):
The first one is one you’ve heard before, but in looking around at workshops I’ve seen and even classes taught and presentations given at conferences and so on, I know that we all need to hear this again. And I mean, us, you and me need to hear this again, because I always catch myself doing this, and that is using too much text in our slides. It’s like we’re writing a book or something on the slide. And that just doesn’t work. That’s not what slides are for. I know when we go in and look at the default templates for slides, it seems like, yeah, that’s kind of what to expect is, to put a bunch of texts in there. I don’t know why those templates are built to put kind of small font so it allows us to jam a ton of text in there. And oh, that just does not work well for teaching, especially the kind of teaching that I advocate, and that is storytelling.
Kevin Patton (15:42):
Whether it’s storytelling in a full-blown lecture, a mini lecture, a preview or a case or whatever it is, I think that anything we do in teaching is really all part of telling the story of the human body. And I’ve talked about that numerous times. So that’s an underlying thread in all of this is, we want to use our slides, we want to use our slide features as a mechanism for storytelling, a help, a support for storytelling. But we don’t want the slides to necessarily tell the entire story. We are the storyteller. The process that the students are going through, their active learning activity or whatever is the storyteller. If we rely on our slides to be the primary storyteller, that’s going to be a weak presentation. We’re going to hate it and our students are going to hate it.
Kevin Patton (16:38):
So, yeah, I’m always finding that I’ve put too much text on the slide and I need to trim it back. That’s the first thing I think of when I’m reviewing my slides. And I do review my slides actually several times before I use them. I go through them not just to sort of practice and really get a handle on the story I’m going to tell, but I make a few passes just looking at the technical aspects like, how much texts do I have. Is it readable? Is it clearly worded? Is the font large enough? Is it a font so that students are going to be able to read? I don’t want to use some curly Q font that I think looks really fancy if it’s not easily readable by students.
Kevin Patton (17:18):
And something that has really helped me is I always ask myself, “Could I use this in a Ted Talk?” And I’ve mentioned this before, this is a great technique. If you haven’t seen Ted Talks, you need to go see some Ted Talks because most of them are amazing and they’re short. They’re usually 18 minutes or less. They have some expert who’s talking about something amazing. They use very few, if any slides. And if they’re using slides, there’s going to be very little text on there. There might be like one word on a slide and they talk about it for five minutes, not necessarily that word itself, but things surrounding that word. So they’re using the slide as a prop for storytelling.
Kevin Patton (18:08):
And that’s exactly how we should be using our slides. They’re props for storytelling. They’re pictures that help us illustrate the story and describe the scene in which the story takes place or describe the characters that are acting in the story. And yeah, the story of the human body has characters. We can think of organs as characters. We can think of cells as characters. We can think of hormones or neurotransmitters as characters. We can think of ions as characters in the story. When you’re telling the story of the action potential or even just the beginning of that story, which is all about what is a membrane potential? What are the actors? Well, the scene is the membrane, the cell membrane, the plasma membrane, and the actors are the ions and the ion channels and the ion pumps.
Kevin Patton (19:00):
So, yeah, we need some pictures of those things to help us tell that story. But if we just in text list out the steps of how a membrane potential is created and maintained or how an action potential occurs, oh, man, only is that going to be really boring and therefore not engaging at all, we’re going to be trying to tell the story where the students are squinting and trying to read this text which they already have in their textbook and/or in other materials that you provided for them, such as a course outline or handout or something like that. And so, oh, man, that is really not using a slide the way it’s meant to be used in my opinion, in my view of the way slides should be used.
Kevin Patton (19:53):
Now, the next question is, what if you need that text? What if you’re teaching on a topic that you’re still a little uncertain of, that your confidence hasn’t grown to the point where you want it to be, where you can just walk out on stage like on a Ted Talk and talk as if you’re an expert in membrane potentials? Maybe you’re not there yet. Maybe that’s a weak spot for you, or maybe it’s not a weak spot for you but you have weak confidence in your ability to tell that story without some notes.
Kevin Patton (20:31):
So, if you need notes for you as a support, even if you don’t look at the notes, I know a lot of teachers that do that, they need to have their notes, but then they never look at them. I’ve been through that phase in my teaching as well. I still do that a lot of times at seminars and things like that. And so, I want those notes there, but I don’t necessarily use the notes. But if you want them there, you don’t want them on your slide, that’s not the purpose of a teaching slide. It’s not to boost your confidence or be a support for you. It’s for your students, for their learning. And they don’t need all that stuff. All that stuff is already there somewhere else. If you need it for you, then put it in the notes section of the slide.
Kevin Patton (21:17):
In PowerPoint, the note section is not always immediately obvious in the editing mode. I run into a lot of people… As you know, I teach in the HAPI Program, so we do a lot of mentoring on how to do effective teaching slides. And I’ll mention this to students and they’ll say, “Note section. What is the note section?” Well, it’s not immediately visible. If you don’t know what it is, if you look at the editing screen of PowerPoint, way down at the bottom of the frame right below the slide that you’re editing, the main part of the slide that you’re editing, just drag up that bottom edge and you’ll see this frame come up and it’ll say “notes” down at the bottom. It’s like, “Whoa, where did that come from? I didn’t know it was hiding down there.” So, you open that up and you can type in your notes.
Kevin Patton (22:06):
And then when you’re in presentation mode, depending on how you got it set up, it might display those notes for you, but it won’t be seen by the students. It’ll be seen by you, but not the students. Another way that you can use those notes if you don’t have the speakers notes view visible in your classroom set up or your Zoom set up or whatever, then, well, you can use it another way. You can print it out as a PDF and have it on your screen, or you can print it out on paper. Make sure that when you print it, you’ve given some options for printing and make sure that you have it print out the slide notes. So now you have a paper version. So there, the notes are all there with a little thumbnail picture of that slide and so you know what notes you need for that slide.
Kevin Patton (23:01):
So, you don’t need to put all that text on the slide to help you. There are other ways to support that confidence that you need or to refer to because you know you’re going to forget something. And it could be that you know it very well, but sometimes you get nervous or get distracted and you forget where you’re at or you forget some detail, and then you look at your notes and then get back on track.
Kevin Patton (23:25):
If you have some texts that you want students to have, like you want them to do to be able to spell carbaminohemoglobin correctly, and so you want that on the slide, well, maybe you don’t really need the word carbaminohemoglobin on the slide. You’re talking about it and so on, but you don’t want them to misspell it. Well, you can put text that you want students to have in an outline that you provide as a handout or on your course website, maybe in your learning management system. And so, they can have that there. And so they know how carbaminohemoglobin is spelled correctly. And they have this maybe a skeleton outline of the major topics you’re covering with some of the terms spelled out and then they can just write their notes on that maybe, or have it alongside their notebook as they’re taking notes. I’ll be back with more tips about using teaching slides in just a moment.
Sponsored by HAPI
Kevin Patton (24:25):
The free distribution of this podcast is sponsored by the Master of Science in Human Anatomy and Physiology Instruction, the HAPI degree. This online degree has been offered for the last 10 years by NYCC, which is, well, just a week ago or so, changed its name to Northeast College of Health Sciences. This new name reflects its ongoing and expanding mission in health science education, including the groundbreaking program that updates both current and prospective professors of anatomy and physiology in contemporary teaching practice and in all the concepts of A&P, and then some. For now, we’re still using the NYCC URL so you can still get information at nycc.edu/hapi. That’s H-A-P-I, or click the link in the show notes or episode page. As I mentioned in the previous episode, there’s a new cohort forming right now. So best get on this soon.
Chunky Style Slides
Kevin Patton (25:50):
This kind of leads in to a discussion of having too much content on each slide. You know, at first I’m thinking, the text. If we’re going to have text, okay, sometimes that’s what you need to do. You need to put some text. It’s best not to write it out in whole sentences and certainly not in paragraphs. The only time you ever want to use a paragraph is when you’re quoting the preamble of the United Nations Charter or something. I don’t know. World Health Organization Charter. I don’t know. But it’s like for a quote or something like that. Yeah, okay, then you need a paragraph. But otherwise, they should be organized usually as bullet points. That works pretty good. They don’t necessarily have to have a bullet in front of it, but just short little points. And think telegraph, think how would you put a message in a telegraph.
Kevin Patton (26:45):
The Telegraph is a method of communication from the olden days where people were charged per character. And so, you wanted to use short words and not very many of them, and you could get a pretty succinct message sent for a pretty reasonable price. And so, think telegraph, don’t think paragraph when you’re constructing your slide. You want to make it concise to begin with. But then, even if you do that, and I’ve done this loads of times where, “Oh, these are nice, concise. These are beautiful phrases that I have here. They really summarize what it is I want the student to see without very many words and the words are simple and clear.” And then I realize, “There’s still too much content here.” I’m moving from one idea to another, to another. And even if they’re they’re related, even if there’s a logic to it, that might just be too much for the student to be looking at at one time. So, what I have done that has really worked well is I chunk it.
Kevin Patton (27:54):
Now, a lot of people are… We’re really worried about having too many slides for their presentation. And to me that seems, oh, I don’t know. That’s like, you’re looking at the wrong thing I think. It’s not how many slides. It’s how much you have on each slide. So if I have 10 points I want to make, “Look, if I make the font small enough, I can fit these 10 points on that slide. Yay. Now I only have one slide. That’s great. Give me a gold star.” No, no, no, no, no. It’s better, if those are 10 different ideas, to put them on 10 from slides. It’s still the same amount of material. It’s still going to take the same amount of time to tell the stories related to those 10 points.
Kevin Patton (28:42):
And yeah, now you’ve got 10 slides instead of one slide. So the number of slides is making a difference, but by chunking it like that where you have one major point per slide, it’s going to help students focus on that part of the story, part number one. And now we’re ready to move to part number two of this story, and then idea number three of the story, and then idea number four. Putting it on different slides really helps with that. And it really helps students focus.
Kevin Patton (29:09):
And students, oh man, this is something that I have to keep relearning myself. Everyone in that room, whether it’s a Zoom room or a face-to-face classroom or whatever, everyone thinks differently. They think differently than me and they think differently from each other. And so, I have to consider that they’re going to be a lot of people who are going to be so confused by 10 points on a slide that they’re not going to be able to think about anything. All they can think about is, “Oh my gosh, what is that?” And so, I need to think about those people. And you know what? When I do that, it helps me too.
Kevin Patton (29:50):
I mean, I can’t cope with 10 ideas on the same slide. I don’t want to cope with 10 ideas on the same slide I’ve found. It’s not comfortable. It’s not as easy. It’s not as easy for me to focus on what I need to be focusing on. This is kind of part of universal design for learning, which is a topic I’m going to talk a lot more about in future episodes. But many of you are already familiar with universal design for learning, but don’t realize that it applies to each individual slide as well or at least it can, and in my view, should apply to individual slides.
Kevin Patton (30:26):
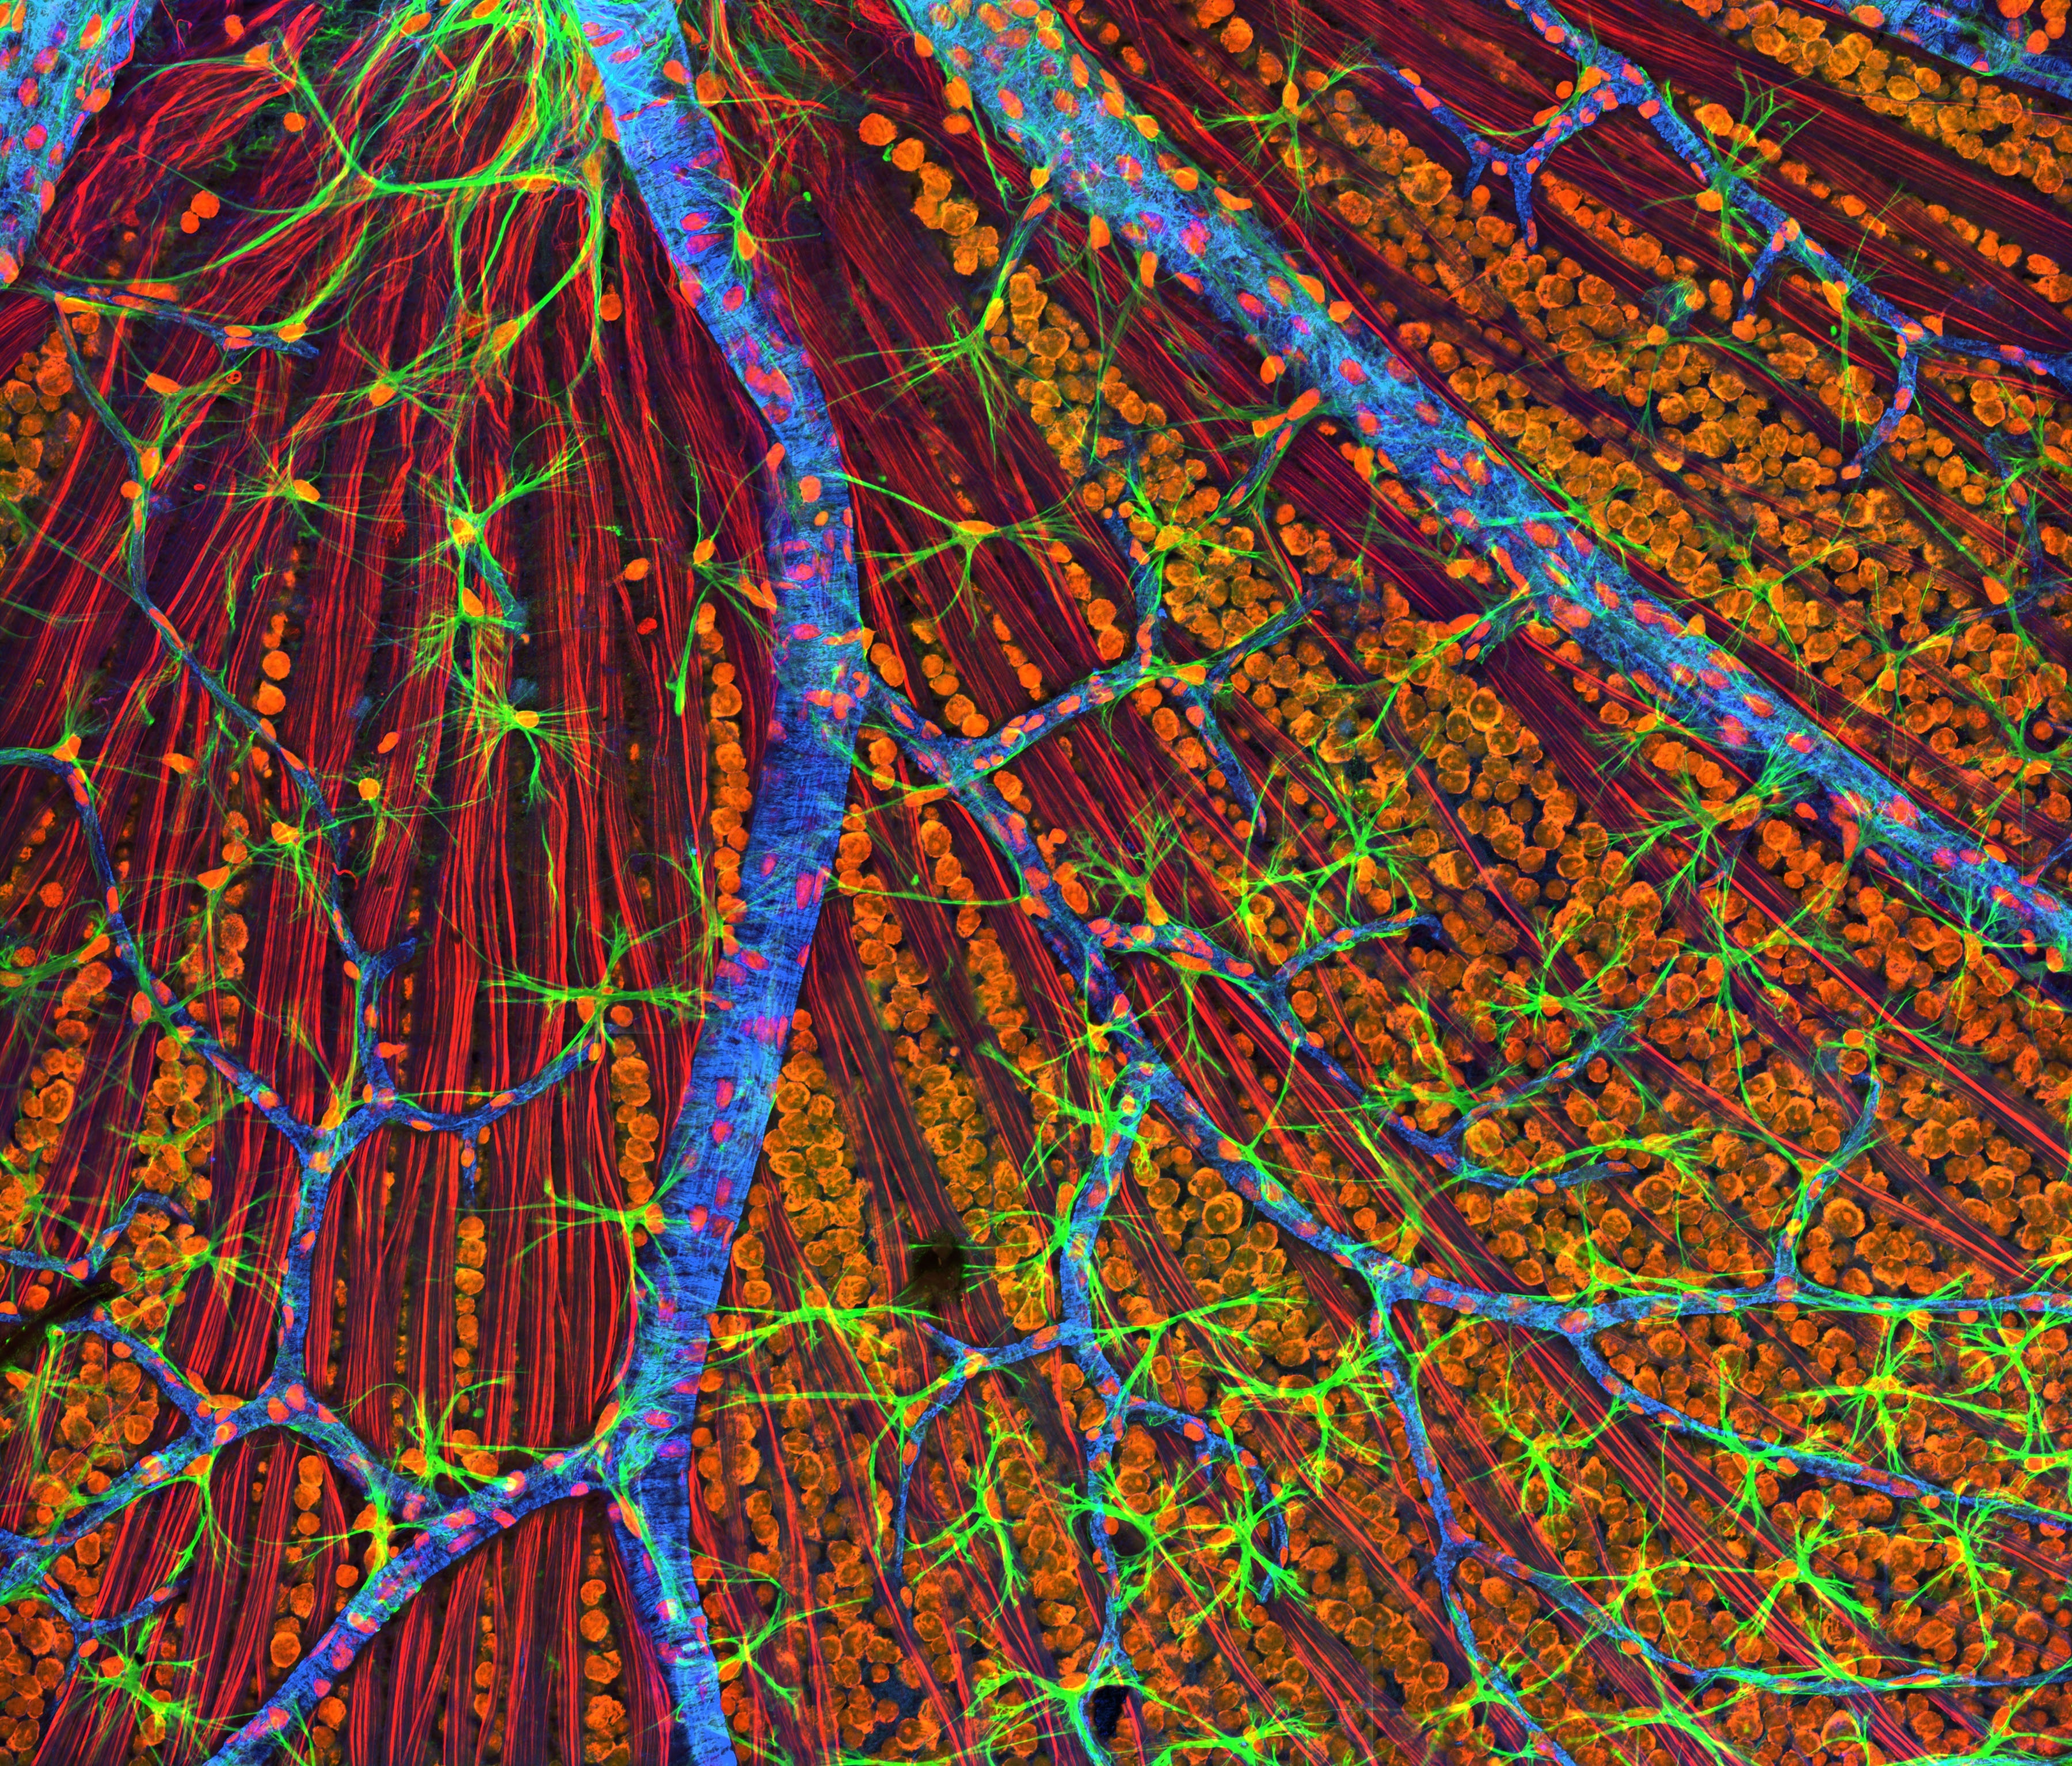
So, moving along here to another tip that I have is that sometimes you have slides that feature an image. Let’s get back to our example of membrane potentials. You have an image of a plasma membrane. You have an image of the ion channels and pumps that are embedded in that membrane, and then you’ll have also in that image little balls or other kinds of particles to represent the ions that are involved in the story, or at least hanging around in the background and affecting the scenario of what’s going on. We’re talking about membrane potentials. So you have a picture. You want to show that picture so that students can kind of have something concrete in their mind’s eye because it’s a pretty abstract notion. It’s a tough thing to teach and a tough thing to learn I think. At least my experience suggests that. And so, yeah, I’m going to have a picture, but maybe I want to have a couple of phrases on there too to kind of identify some things that are happening in the story or some things that are in that scene.
Kevin Patton (31:40):
And you know what I see a lot of people do? And I’ve done this before. I’ve done this a lot and I’ve found out it just does not work well, and that is, to have all your texts on one slide and then have an image on the next slide. I can’t tell you how many times I’ve seen people give the steps of what goes on to produce an action potential and they’ll give it in text; Step 1, Step 2, Step 3, or just a numbered list of steps, and so you go through it all. Okay, you can use that to tell the story if you want. I don’t think that’s the best way to tell the story, but if you want to do that, that’s fine. And then on the next slide, they’ll have a picture of those steps sort of happening in either one or a series of images.
Kevin Patton (32:28):
So, what are you going to do with that? You’re going to expect the students to have completely mastered those text-based steps that you just gave them and hold that in their brain as you move to the next slide, and now here’s the picture of it? Really? That took me several courses to really figure out how action potentials work. It certainly is not going to take me the five minutes that you took on that slide of steps and still be in my brain and understandable in my brain as I moved to the picture. You want to have the text and the picture on the same slide. And you know what? That’s hard, not always, but a lot of times it’s hard.
Kevin Patton (33:15):
What it’s going to force me to do when I do that is really trimmed down that text and not rely on the text anymore. And that’s what I was getting at earlier in my suggestions, is let’s not rely on the texts. Let’s rely on images. That’s what slides are for, for providing images and visual relationships and things like that. Not to just be a book that we’re projecting onto the white board or onto the computer screen. That’s not a good use of that tool. I don’t think.
Kevin Patton (33:50):
So let’s try to get the text on the same slide as the image. Now, the problem with that is, we want to use as big an image as we can so that that’s what the students focus on. And I know that again, these darn templates that are built into PowerPoint and Google Slides and so on, they kind of give you this little box with lots of white space around it on the left and a little box with lots of white space around it on the right. They kind of suggest that you can put text in one and an image in the other. If that’s the only way you know how to do it, well, then do it that way. But I suggest that you play around with it a little bit. Drag the corners of those little frames that are in the template out so you can have a really big image. As a matter of fact, what I often do is just make that image the whole slide.
Kevin Patton (34:40):
This is another thing that people really love, and that is titles. Because that’s what the template has. It has this big giant title that takes up 20 to 25% of the whole space, all that real stake that’s wasted on that slide on some dumb title that says kidney. Well, we already know we’re talking about the kidney or the urinary system or whatever you have on your title slide. You don’t need that title slide unless that’s all you have is a title. And you’re just verbally telling the story. Okay. And maybe you have a model of the kidney in your hand or something like that, and so, you’re using that as your prop for your story. Okay, good. Fine. Use the title then. But if you have a big, giant title that’s taking up 20% or more of your slide and then you try to fit an image of the kidney and then you try to fit all these words describing, let’s say the parts of the kidney, then, oh, golly, that’s not going to work very well. At least in my experience that doesn’t work very well.
Kevin Patton (35:42):
Get rid of that darn title. Now you’ve got lots more space. And then stretch that image out. Now you’ve got to stretch it proportionally and I’ll come back around to that idea in a couple of minutes. But, the idea is that you want to make that image as big as possible because that way the students can read the labels that are on the image if you have any labels, if it’s an image from your textbook for example.
Kevin Patton (36:07):
And not only the labels might be important, but also the details. If all they see is the rough outline of a kidney, I mean, “Yeah, okay, it looks like a bean. That’s all I can get out of that slide. I can’t see what that instructor’s talking about pyramids and calyces and columns and cortex, medulla, all that stuff.” No, no, no, no. They need to be able to see that stuff. So you need to have a big kidney where the parts are easily seen. Not seen by squinting and moving your head up a little bit, asking the person in front of you, “What is that little dark spot there?” and so on. No, no, no, no. You want it big so everybody can see it easily. Even people that maybe can’t see so well.
Kevin Patton (36:54):
I mean, I’m kind of used to seeing things pretty well. I have a really good optometrist, but not everybody can do that, so we want it big. And move the text way off to the side or even overlap the text over the image a little bit, because a lot of those images have a lot of white space built into them anyway. It doesn’t have to be in a box that’s totally separate from the image. If there’s room, put it in there.
Kevin Patton (37:21):
Now of course, this takes some finesse. I mean, you got to make it so it’s not so confusing or jumbled together that students aren’t going to be easily be able to interpret what’s going on there. But you can do it. It just takes some practice and it takes a good eye. One of my secret weapons is looking at it again later. Setting it aside, go do something else, and then come back and look at it again later. Then you’ll see like, “Oh my gosh, that all runs together. I can’t tell what that is. I better fix that. So, yeah, okay. Let’s try to have the text and image on the same slide and let’s make it so the image is featured and the text is not featured and let’s be creative.” Let’s literally go outside the box, those little boxes of the template. Think outside those boxes and think about how it’s going to be best for teaching.
Kevin Patton (38:17):
And speaking of artwork and images that we’re using and I mentioned if you’re using an image from the textbook, make sure that it’s enlarged enough on the slide that the students can actually read the labels. If they can’t, then you’re going to have to edit in your own labels or cover up the labels or do something like that because students are going to try. If you think, “Oh, they don’t need to read the label so it’s okay if they’re small. I don’t need them looking at the labels.” They’re going to try anyway.
Kevin Patton (38:45):
And as they’re squinting and trying to read those labels, you know what they’re not doing? They’re not listening to you tell your story. That’s the whole point, is to hear you tell your story. That’s part of your job. You’re conveying the story. Or if it’s not you, maybe it’s part of a discussion. But they’re going to be focusing on that slide trying to read those labels and not listening to their fellow students discuss. They’re not going to be listening to the elements of this case that they’re doing in their case study activity or their problem solving or whatever it is they’re doing. And so, yeah, we need to think about everything. I mean, that’s one of the tricks too, is being detail oriented, not just slapping it together any which way. We need to think about how it’s going to play out. Let’s take a brain break and think about something else for a minute before we come back to more teaching slides.
Sponsored by HAPS
Kevin Patton (39:45):
Marketing support for this podcast is provided by HAPS, the Human Anatomy and Physiology Society, promoting excellence in the teaching of human anatomy and physiology for over 30 years. Hey, I’m going to be speaking at the upcoming Virtual Regional Meeting in late September. I’ve been to a lot of the HAPS Regional Meetings, both virtual and face-to-face. And I got to be honest. They’re not exactly the same as the annual conference. They’re amazing in some of the same ways as the annual conference, but they’re also amazing in their own unique ways too. For one thing, they don’t require as big a commitment of money, time and travel. Usually get to see both old friends and a whole lot of folks who don’t usually get to go to the big annual conference. Often, there’s way more folks from your part of the world there. And of course, a handful of folks like me who try to go even if it’s outside my region. To find out more about Regional Meetings, go visit HAPS at theAPprofessor.org/haps. That’s H-A-P-S.
Where Art Thou?
Kevin Patton (41:09):
Using art from the textbook, something I want to say about that that I really strongly believe is no matter what textbook you’re using, you want to try and feature the images from that textbook. All the major textbook publishers provide images from the book that you can use for that very reason. Sometimes they’ll even have some pre-made slides. Now, I don’t like using pre-made slides. I don’t like using pre-made much of anything as far as a teaching tool goes, because I kind of have developed my own ways of doing things. And they don’t necessarily follow along with the way I want to tell a story or things that I want to emphasize. So I will look at those tools, but I don’t necessarily use those tools myself. But I do use the images either labeled or unlabeled, depending on what it is and how it works out on the slide.
Kevin Patton (42:03):
But the reason why I want to use textbook images is because that’s what the students have available to them. That’s what they’re used to seeing. So, if they’re looking at neurons and plasma membranes in a neuron in their textbook and they’re looking at the way ions are represented in their textbook and the way those little ion channels and pumps are represented in the textbook and then they walk into class and you’re showing them something that looks very different; different colors, different shapes, different perspective, they’re going to have a hard time. Even students that don’t typically have a hard time connecting things, they’re going to have a tough time connecting it.
Kevin Patton (42:45):
And you might think, “Oh, but this is much more beautiful than what’s in the textbook. Or this is from the textbook I used in graduate school so therefore it must be better.” No, it’s not better if it’s not going to work for the students. And so, for naive learners, this is critical for connecting what they see in their textbook with what you are telling them and showing them in your storytelling. So my advice is to always use the image from the textbook is your primary teaching image.
Kevin Patton (43:24):
Now, learners do not have the level of expertise that we do, so they’re not going to be able to make connections. But even those of us that have a certain level of expertise are going to find it that jarring to go from one kind of representation to a very different kind of representation. So, we need to think about that. Again, it goes back to universal design for learning. We don’t want to trip our students up. There are going to be students in our course that are going to have weaknesses in their processing. They’re not going to be able to process things the same way we do or maybe not as easily as we do and make those connections. And so, we’re throwing an unnecessary obstacle in front of them by insisting on using the images from this other textbook which, “I liked better. And why didn’t my department pick this one, because I liked this other one better?” You want to use the images that the students have.
Kevin Patton (44:18):
Let’s start with the obvious thing that the students have already, at least theoretically or at least potentially, have had some experience with. And if they haven’t already looked at their book, at least they have their book available to go on back and look at it later. It also works in reverse so that what they’ve seen in your explanation and your storytelling, they’re going to be able to recognize again when they open up the book later on.
Kevin Patton (44:50):
Now, I’m not saying only use the images that are in your textbook, because I don’t do that. And even when I use my own textbook in teaching, but I don’t do that. I start with that. That’s my primary mode. But then I’ll get to a point where I feel like we’ve been exposed to that. We’ve learned a little bit about that, and I’ve found some image somewhere else, maybe in another textbook, maybe in that textbook that I used in graduate. So, no, it can’t be that anyway. That’d be so outdated by now, but some other. I have tons of references in my library and in our school library and so-and-so. Maybe I found a really cool image maybe from a different angle than we’re used to seeing in our A&P textbooks, or maybe it shows some detail better than it does in the textbook. And that’s a frustrating thing as a textbook author.
Kevin Patton (45:42):
My textbook is gigantic, my two semester textbook. It would be super-duper gigantic if I didn’t have to think about page count. I’m limited. If I only have this much space to put in images, they have to be images that can do double, triple, quadruple duty for a variety of purposes. And there might be some image that I would love to put in there, but there just isn’t room. But we as instructors, if we feel it’s that important, we can find an image like that one or even draw it or have someone draw it for us, and we can put it in there and do that.
Kevin Patton (46:20):
Now, it’s ideal if it’s close to the same style as the image from the textbook, but sometimes it’s not. And so, what we can do is make the connections for the students and say, “Okay, see, this is the membrane here. It’s blue in the picture in our textbook. And here, they’re showing it in green, but see, that’s the membrane. And see these little ion channels? They were green and pink in the textbook, but here they’re blue and yellow.” You get them oriented and help them make that connection. Again, universal design tells us that that works not only for students with challenges, it works for all of us. It works for Albert Einstein if he were still alive. And he had some challenges in school by the way, so there you go. You need to think about people like that. And so, we make those connections form and then we say, “But look at it. It’s at a different angle. And now we can see something different than we saw before. Isn’t that cool? Isn’t that important? Here’s why it’s important.”
Kevin Patton (47:25):
You know, a lot of times I see people teaching with slides that, oh my gosh, they just go from one set of colors and style to a completely different set of colors and style. And they’re representing the same object, but maybe from a different angle. And, oh, putting that together, you may know what you were looking for and what’s there because you’ve had time to think it through and compare them and interpret them, but somebody seeing it for the first time, especially our naive students, they’re not going to have that. And that mismatched art and that mismatched style even is going to be confusing. I guarantee you it’s going to be confusing at least some students. And I don’t want any of my students to be lost.
Slide Tricks
Kevin Patton (48:17):
Yeah. I know. That’s only half the slide tricks that I wanted to talk about, and yet it’s a lot. We covered a lot. So just a brief summary. I talked about avoiding too much text on each of our slides. And I referred to Ted Talks and mentioned how highly effective Ted Talks. If they use slides at all, are going to use very few slides with very little, if any, text on them. Another thing that I mentioned was, if you need texts in order to keep you on track or to fill in blanks that you think you’re going to forget, then you can put that in the speaker notes. And if you think students need some things in writing to kind of support the story, well, you want to put that in a handout, especially things like carbaminohemoglobin that you want them to get the correct spelling of.
Kevin Patton (49:05):
I talked about not putting too much content in each slide. So, yeah, once we’ve reduced the amount of text we have, but we have 10 ideas on a slide, we want to chunk that so that we have one idea per slide. That’s part of universal design; chunking it so we can focus on one idea at a time. And then I talked about the case when you have a whole bunch of texts on one slide that explains the image that’s on the following slide. In other words, the text and the image are separated. I talked about how it’s best to get those back together and talked about ways to do that. And then I spent quite a bit of time talking about the advantages of using art from the textbook as our primary source of art and then just kind of seasoning it with a few outside images that we can help students then make connections of. But we want to start with the art that they are at least theoretically familiar with because it’s in their textbook. But there’s lots more. That’s going to be coming up in the next episode, Episode number 96.
Staying Connected
Kevin Patton (50:12):
Well, I went over quite a few tips on changing up the way we make and use slides for teaching. Some of them may strike a chord and some of them may rub you the wrong way, but the next logical step is to talk about it with your colleagues. But, they need to hear this episode first. There’s an easy way to share this podcast with a peer and also earn yourself a bit of cash. Simply go to theAPprofessor.org/refer to get a personalized share link that will not only get your friend all set up in a podcast player of their choice, it’ll also get you on your way to earning a cash reward.
Kevin Patton (50:59):
If you don’t see all the links I provided you in your podcast player, go to the show notes at the episode page at theAPprofessor.org/95. And while you’re there, you can claim your digital credential for listening to this episode. And don’t forget, you can help out and contribute to this podcast or other projects of The A&P Professor Network at the podcast hotline. That’s 1-833-LION-DEN. That’s L-I-O-N-D-E-N or 1-833-546-6336. Or send a recording or written message to podcast@theAPprofessor.org. You’re invited to join my private A&P teaching community way off the social platforms at theAPprofessor.org/community. I’ll see you down the road.
Aileen (52:07):
The A&P Professor is hosted by Dr. Kevin Patton, an award-winning professor and textbook author in human anatomy and physiology.
Kevin Patton (52:20):
Students are going to want to recommend this podcast to their instructors.
This podcast is sponsored by the
Human Anatomy & Physiology Society ![]()
This podcast is sponsored by the
Master of Science in
Human Anatomy & Physiology Instruction
Transcripts & captions supported by
The American Association for Anatomy. ![]()
Stay Connected
The easiest way to keep up with new episodes is with the free mobile app:
![]()


Or wherever you listen to audio!

![]()

![]()


Click here to be notified by email when new episodes become available (make sure The A&P Professor option is checked).
Call in
Record your question or share an idea and I may use it in a future podcast!
Toll-free: 1·833·LION·DEN (1·833·546·6336)
Email: podcast@theAPprofessor.org
Share


Kevin's bestselling book!
Available in paperback
Download a digital copy
Please share with your colleagues!
Tools & Resources
TAPP Science & Education Updates (free)
TextExpander (paste snippets)
Krisp Free Noise-Cancelling App
Snagit & Camtasia (media tools)
Rev.com ($10 off transcriptions, captions)
The A&P Professor Logo Items
(Compensation may be received)


